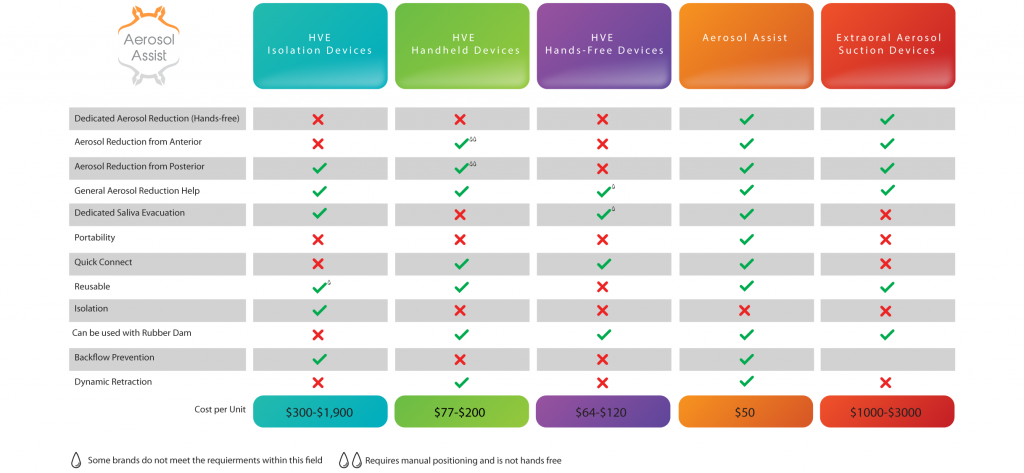
Compare The Aerosol Assist


The most important concept to understand is that something should be used. That something is determined by your needs and the procedure. The check marks are a tool to aid you and are not reflective of one device being better than the other. If it works for you then that is the best device. 

Definitions. 

  • Dedicated Aerosol Reduction (hands – free)  – No one wants to hold an instrument when it can be held by the patient. With posture, hearing and eyestrain being able to reduce a burden is a necessity especially when we have the technological advancements to do so. 
  • Aerosol reduction from anterior-  a design in the engineering of the device that focuses on aerosol and splatter reduction when working on the anteriors. 
  • Aerosol reduction from posterior – a design in the engineering of the device that focuses on aerosol and splatter reduction when working on the posterior region.
  • General Aerosol reduction help – In order to be considered an aerosol reduction device a certain amount of volume must be evacuated. The minimum needed is an 8mm bore hole to remove such a large volume of air. It really depends also on the smallest channel that a device will have as this will be the limiting factor of how much volume can be removed through that opening. 
  • Dedicated Salvia Evacuation – a design in the engineering of the device that is dedicated solely in removing intra oral fluid. 
  • Portability – is the device simple enough to take from operatory to operatory or clinic to clinic in a manner that isn’t too burdensome. 
  • Quick Connect – does it have the functionality to lock in place
  • Reusable (autoclavable) – can the device be autoclaved and reused multiple times?
  • Isolation – does the device offer any form of isolation native settings. 
  • Can be used with Rubber Dam – can the device be used in conjunction with a rubber dam
  • Built in backflow protection – does the device offer backflow prevention.
  • Dynamic Retraction – can the device be used as a retraction mechanism without disturbing its functionality.

Con

Patients with limited ability to open,

  – TMJ issues, pharyngeal or gag reflex,

  – Partial or fully edentulous patients, malocclusion,

  – Any procedure where both the right and left quadrants needs simultaneous  access (ex. Veneers from 6 – 11 –   – Quick procedures that generate aerosols. 

  – Set up time is increased

  – Sizing must be done per patient.

          Ideal Procedures:

  – Posterior restorative, Hygiene (SRP) 

Pro

  – Procedures where isolation and stability is key, especially the posterior regions.  

  – Long procedures when the patient can tolerate a bite block

  – Tongue, cheek and airway are protected

  – No choking on fluids or aspirating debris

  – Bite block eliminates the strain of keeping the mouth open

Aerosol Assist Kit (Package of 6)

$199.00

  • Includes 6 Hands Free Autoclavable standalone Aerosol Assists
  • Autoclavable, Sterilization Cycle 30 Minutes @ 121 Degrees Celsius at a minimum 15 PSI
  • Class VI Biocompatible
  • Good chemical compatibility
  • High Impact Strength
  • High dimensional stability
  • Very good resistance against high energy radiation (gamma and X-rays)
  • 6 Month Manufacturer Warranty, if anything happens to your Aerosol Assist within 6 months of your purchase, we will replace it at no additional cost. 
  • Fits standard 11mm HVE
  • Works with standard saliva ejectors
  • 30 days to return for refund
  • 6 months warranty replacement


SKU: PTAA-AASA-1 Category:

Description

Attaches to standard HVE connections

Dimensions:10.5 in x 6.5 in x 4in

Connection O.D.: 11mm (Standard HVE Connection)

Height: 135mm

Weight: 20g

Reusable and Autoclavable

6 Month Manufacturer Warranty
3 Aerosol Assist Kits (Total 18 Aerosol Assists)

$559.00

  • Able to meet the demands of a typical office
    • -2 Hygienist
    • -2 Dentist
  • Includes 18 Hands Free standalone Aerosol Assists
  • Autoclavable, Sterilization Cycle 30 Minutes @ 121 Degrees Celsius at a minimum 15 PSI
  • Class VI Biocompatible
  • Good chemical compatibility
  • High Impact Strength
  • High dimensional stability
  • Very good resistance against high energy radiation (gamma and X-rays)
  • 6 Month Manufacturer Warranty, if anything happens to your Aerosol Assist within 6 months of your purchase, we will replace it at no additional cost.
  • Fits standard 11mm HVE
  • Works with standard saliva ejectors
  • 30 days to return for refund
  • 6 months warranty replacement 


SKU: PTAA-AASA-1-CEP Category:

Description

Attaches to standard HVE connections

Dimensions:10.5 in x 6.5 in x 4in

Connection O.D.: 11mm (Standard HVE Connection)

Height: 135mm

Weight: 20g

Reusable and Autoclavable

6 Month Manufacturer Warranty

Frequently Asked Questions

We've compiled a list of answers to common questions.

  • After installing the saliva ejector into the aerosol assist, verify the O ring inside the HVE is intact then install. The Aerosol Assist is designed to allow for easy rotation on the HVE. If it is loose your O-ring may be worn out or missing.
  • Every 3- 4 months depending on the use.
  • The aerosol assist starts falling off too easily.
  • Contact your local TRUSTED dental service technician. They have the right piece on hand. Just ask them to change it and test it out to make sure the right one is placed to get a great fit. Don’t have a trusted local dental service technician? Contact your dental product representative and tell them you need new HVE O-rings.
  • The aerosol removal port was designed to have a tight fit of the saliva ejector from the initial point of  insertion to fully inserted in order to optimize airflow, maximize aerosol suppression and prevent unintentional disengagement.
  • If it seems excessive force is being used in installation of the saliva ejector or the saliva ejector does not go all the way down please refer to the following questions.
  • Insert saliva ejector to the deepest length which can be visualized by noting the saliva ejector tip is flush with the aerosol assists buccal plate.
  • Please call +1 (855) 662-3775 or email us (contact@aerosolassist.com) so we can troubleshoot this issue.
  • Because we do not use any glues or paints on the Aerosol Assist the manufacturing process can lead to interior channels that are too tight. If the Saliva ejector does not go all the way down this will lead to poor performance. We will ship you a new one if that’s the case.
  • 1 kit comes with 6 Aerosol Assist. Depending on your patient load it can vary.
  • For Hygienists who typically see 10 to 15 patients 1 kit is sufficient for a patient load of that size when the autoclave is run twice.
  • For Dentist
    1. Because they see less patients and procedures vary 2 Aerosol Assist should be enough for the day.
  • Just like everyone should wear a mask to have any beneficial effect, every operatory should have aerosol suppression technology for the simplest procedures to the most complex. For a practice with 1 hygienist and 1 dentist 1 kit should give you the protection that is needed.
  • Please refer to the setup video here: https://www.aerosolassist.com/setup/
  • Step-1: Wet the inside of the Aerosol Assist to aid in insertion of saliva ejector.
  • Step-2: Bend the tip of the Saliva ejector
  • Step-3: Install the saliva ejector into the aerosol removal port making sure it goes into the posterior channel. Inserting it to the deepest length can be visualized by noting the saliva ejector tip is flush with the aerosol assists buccal plate.
  • Step-4 Holding the aerosol assist, pull down on the saliva ejector wiggling from  side to side  until it passes the 2 construction points.
  • Step-5: Press the saliva ejector so that it touches the body of the aerosol assist.This position avoids gag reflexes by not touching any gums, teeth or any other anatomical landmarks.  It was designed this way to provide a comfortable position for the majority of patients that is effortlessly repeatable.
    • If a longer length is required insert fully and visualize the extra length needed by trying it in the mouth. Then pull to the correct length following the same instructions making sure the saliva ejector follows the patient’s anatomy and does not go too deep.
    • The aerosol removal port was designed to have a tight fit of the saliva ejector from the initial point of  insertion to fully inserted in order to optimize airflow, maximize aerosol suppression and prevent unintentional disengagement.
  • Step 6: In the instance of excessive intra oral fluids pooling, adjusting the saliva ejector will be necessary. When properly installed the saliva ejector is positioned to remove intra oral fluid with minimal contact on tissue making sure its ports are unobstructed by any anatomy. 
  • The saliva ejector
    • ports are clogged with debri
    • ports are clogged with patient anatomy
      • if it is lodged between tongue and
  • Malposition
    • Its to high up and is not positioned low enough to get to the liquid
  • Reduces up to 90% of aerosols
  • Installs easily
  • Can be used on any patient
  • Hands-free operation
  • Helps maintain the position of salivary ejector
  • Cost effective ($0.33 per use including the cost of saliva ejector)
  • Removes 90% of aerosols produced.
  • Can be used for lip retraction, thus keeping one hand as clean as possible.
  • Reduces splatter.
  • Easier clean up for patient
  • Less indirect contact transmission
  • Dentists
    • General practitioners, pediatrics, orthodontists, endodontists, periodontists, oral surgeons, and prosthodontists
  • Hygienists and Assistants – Every procedure, from the simplest to the most complex, is now up to 90% aerosol free
  • Aerosol Assist upgrades any procedure that requires salivary evacuation to include aerosol removal capabilities.
  • Designed to be a universal fit.
  • Any patient can have the the benefit of using the Aerosol Assist but it can also be used with patients who previously couldn’t use other devices that reduce aerosol transmission such as
    • Patients with limited ability to open their jaw
    • Patients with malocclusion that does not allow for a bite block to be used
    • Patients who are edentulous
    • Patients whose tori restricts them from using an isolation device.
    • Severe gag reflexes
    • TMJ issues – pain on using bite blocks due to limited opening or pain when in a static position.
  • YES!. Every system has a learning curve but we made it as simple as possible to get going with predictable results from the start. Every curve and dimension on the Aerosol Assist was designed to have simplicity and efficiency in mind. One example is the installation of the saliva ejector. Simply insert a disposable saliva ejector as deep as possible. You know you are at the right length when you see the tip of the saliva ejector flush with the buccal plate. Then place it on the side of the mouth that will be worked on for maximum aerosol removal or the opposite side of where you will be working for excellent visibility.
  • Along with a salivary ejector, it is lightweight and portable. The salivary ejector is in a static position that can be positioned by the clinician. Once the optimal position is determined, the patient will be more comfortable and less likely to want to hold it. Explaining that will increase their compliance. It can further be
  • With the Aerosol Assist, you increase productivity and invest in your health. The system prevents respiratory infection, which is the most common reason reported by dental clinicians for missing work.
  • Cleans the procedure room faster and with fewer materials and better results.
  • PPE is maximized now that your mask, face shield, and gown get less exposure.
  • Some patients hold the saliva ejector because they want to be in control, so ask them to place it in a comfortable position. Some prefer removing all the liquids that accumulate, and others prefer not to touch any anatomical landmarks. It wastes time for you to stop repeatedly when the salivary ejector moves around. You save time when it is placed and kept in a comfortable position.
  • Less cleanup for the patient
  • Less cleanup for the staff
  • When 90 % of the aerosols are removed through our device this leaves only 10% to worry about. It is important to focus all our attention on the 10% left and put the 90% on automatic reduction by just implementing the Aerosol assist to your office.
  • We are able to use anatomy and physics to our advantage. By removing pooling liquids from the interior of the mouth with a dedicated disposable saliva ejector we can minimize the amount of liquids in the oral cavity that have the potential to get aerosolized by pressure of a high speed hand speed and are able to create a small vacuum inside the mouth that slows down the speed of aerosolized particles as they form from a ultrasonic instrument. As they leave the mouth at a slower speed we positioned the aerosol port as close to the exit of the mouth as possible. This allows slow moving aerosolized particles to be easily suctioned in. The best part is its hands free to allow you to do the work and not have to worry about it.
  • Primary stability is with the orbicularis oris and buccinator muscle. We created the aerosol assist to have architecture that increases stability without needing a bite block. Why is that important? We have heard many patients complain of TMJ discomfort due to bite blocks. A patient with malocclusion due to misaligned or missing teeth can not use a bite block as well. The question now is can we add a bite block to our product? Yes and we have a design that will be launching soon.

Thank you for your interest in the Aerosol Assist. Directly we do not offer samples but we have given every representative demo units with Patterson Dental and Midway Dental. Just contact them or we can do it on your behalf by filling out this form and will do our best to connect you with a representative that can help. Once connected the dental representative will lend you one to try to make sure it meets your needs.

Can’t find what you need? Our award-winning customer care team is here.